Please explore the information below as it will guide you through the NEW Waitlist Process
How the Waitlist Works:
Join the Waitlist: When a course is closed, select “Waitlist” as your action during registration.
Check your Student Email: If a seat becomes available, you’ll receive an email at your college-assigned email address with instructions to register.
Take Action Quickly:You’ll have a set amount of time from the time the email is sent to log in and officially enroll in the course before the spot is offered to the next student.
Before the semester begins: If you get a waitlist email during the regular registration period, you’ll have 72 hours to claim your seat.
The week before classes start: Beginning that Monday, you’ll have 24 hours to claim your seat once you’re notified.
Once Courses Begin...
Get Add Codes from instructors after the third day of class.
Add Codes are single-use codes and they will expire! Use the code ASAP to register or they will expire.
Student Guide to Course Waitlists
If you need to register for a class, but it is full, you can join the waitlist, to be added to the course. If a seat becomes available, students will be invited to join the course via email. You must respond quickly to secure your seat. You only have 48 hours to accept your invite to the course.
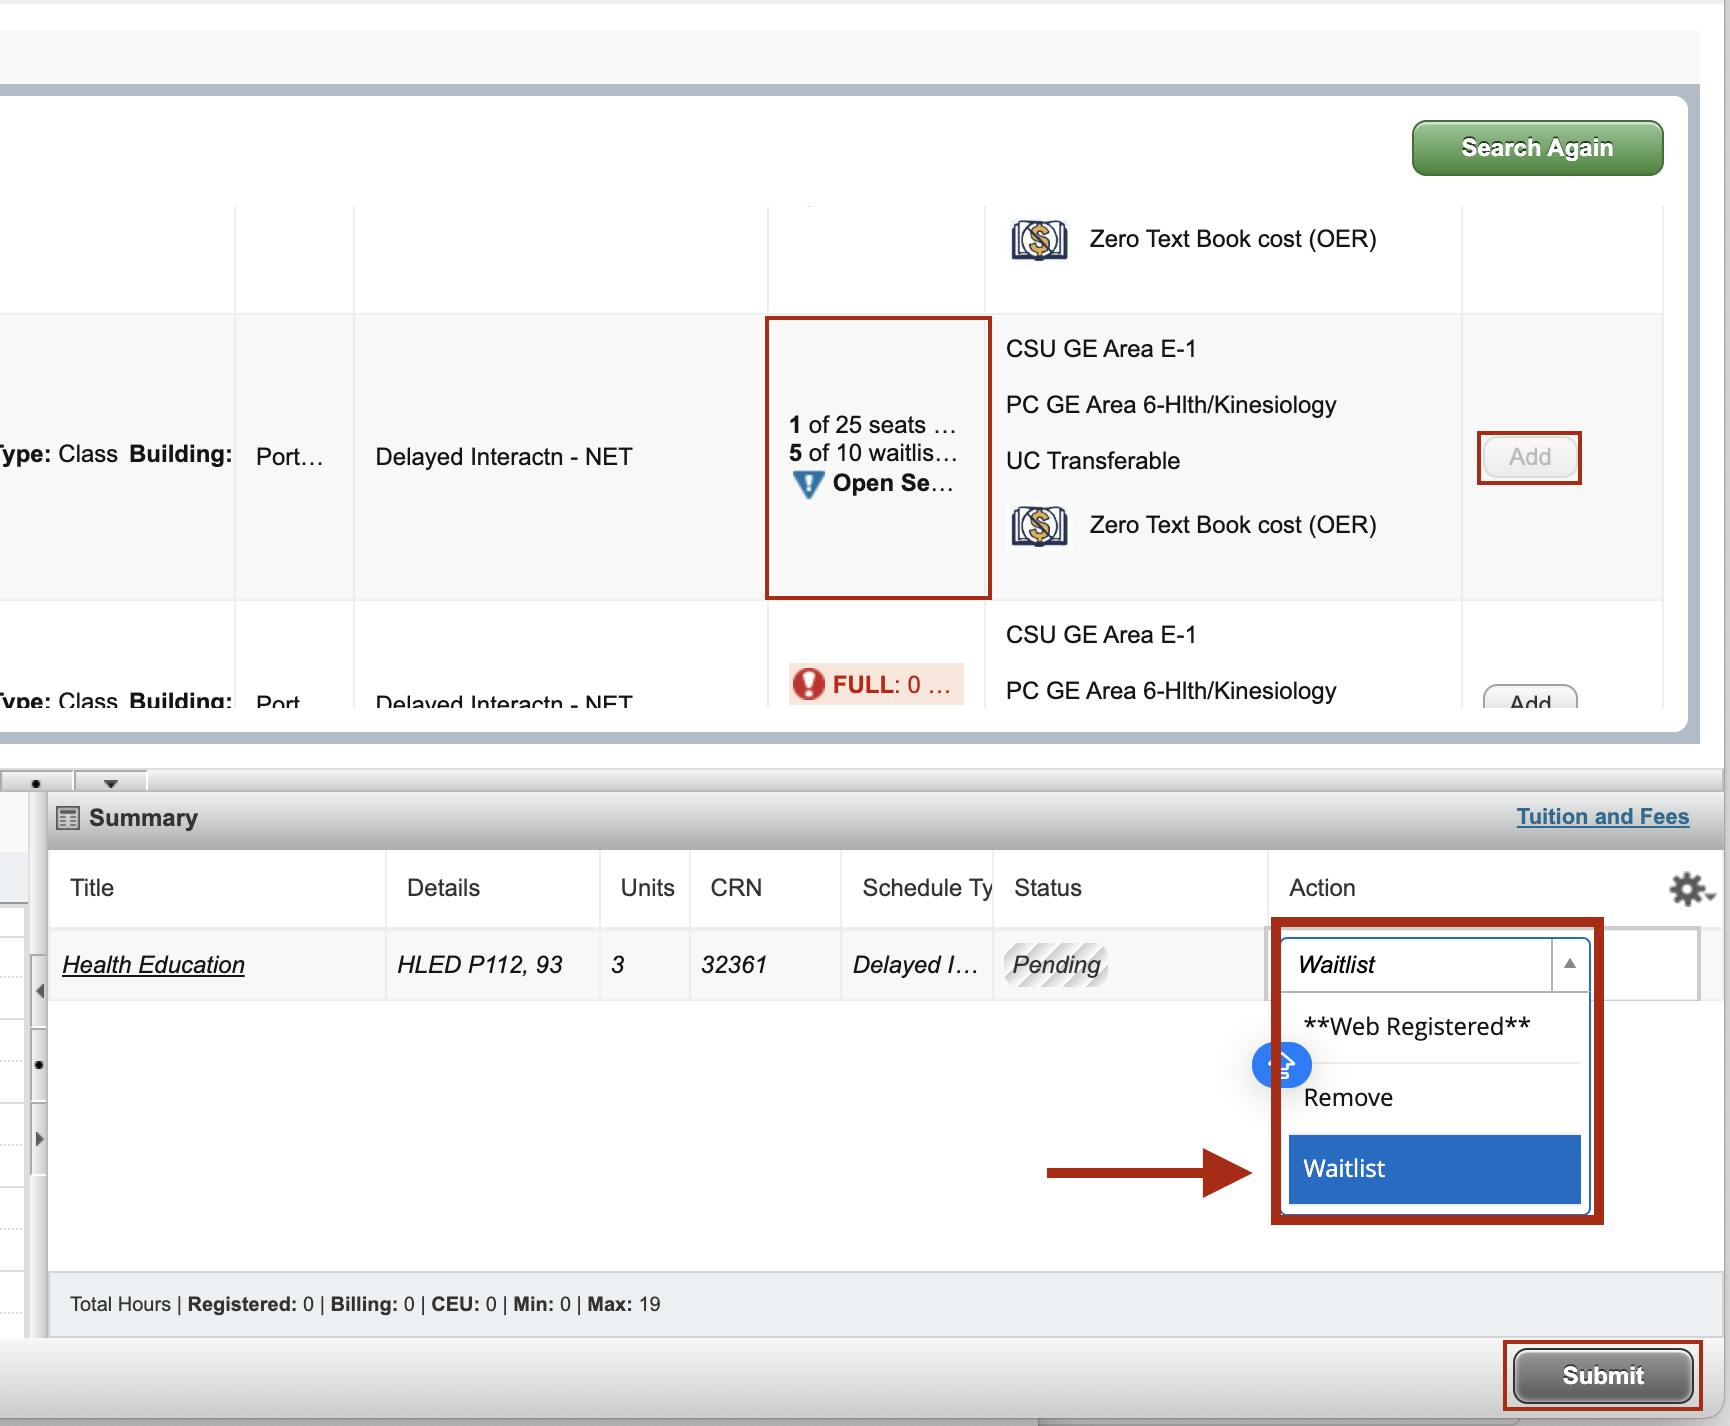
When Registering for a Class That's Full:
Search for your course in Self-Service Registration.
If the section is full and has a waitlist, you will see the Waitlist Available count.
Click Add. The course will appear in your registration summary with a Registration Add Error – Closed Section message.
From the Action dropdown, select Waitlist.
ClickSubmit.
The course status will change to Waitlisted (WL).
Just so you know.....
You will not be enrolled or billed yet, but you will be assigned a waitlist position automatically in the order you joined.
You can view your waitlisted classes anytime in your Class Schedule in Self-Service.
You Will Stay on the Waitlist Until:
A seat opens up, and
You receive a waitlist notification via your student email
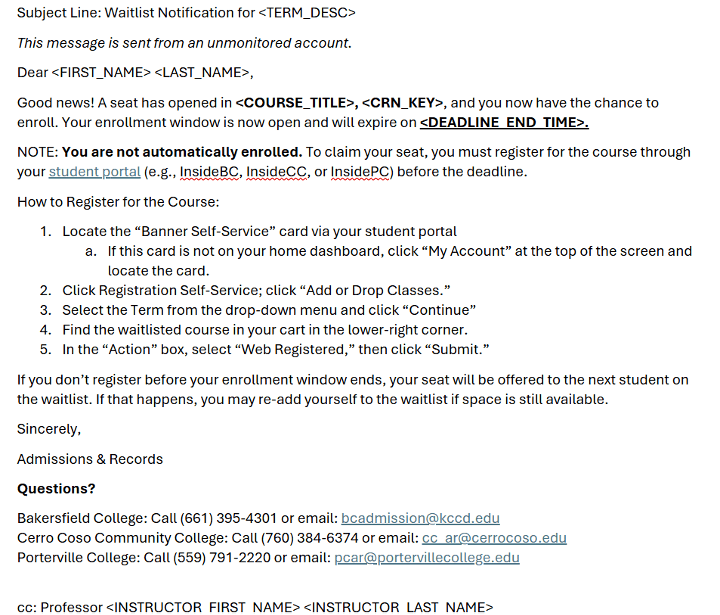
When a Seat Becomes Available,
Check your email regularly — the system will email you when a seat opens.
The email will include the Course Reference Number (CRN), course details, and your registration deadline.
You will need to take action to add the course once you get the waitlist notification. Follow the email Instructions.
Helpful Reminders about your schedule and wait listed courses:
If you register successfully, your course status will change from Waitlisted to Registered, and the class will appear on your schedule.
To handle a time conflict if the class you want to add conflicts with another registered class on your schedule:
Drop the conflicting course and add the waitlisted course and click Submit (Note: After updating all actions, click Submit to finalize your changes).
If you miss the course add deadline, the system will automatically remove you from the waitlist and notify the next student.
If you are on multiple waitlists for the same course, once you register for one section, you will automatically be dropped from the others.
Claim Your Seat Quickly!
During the registration period until the Monday of the week before the semester starts, you have 48 hours to claim your seat. 72 Hour timeframe ends January 11th.
Starting the Monday of the week before the semester starts (January 12th), you will have 24 hours to claim your seat.
Your registration expiration day and time will be on the email you receive.
Note that the 24-hour window applies from all classes starting after the Monday of the week before the semester starts, including all late-start classes.
Student Responsibilities:
Check your email often — you’ll receive only one notification when a seat opens.
Follow your college’s expected practice about attending class while waitlisted This doesn’t apply to online classes, where pre-registration attendance is not an option.
Add yourself to a waitlist even if the class conflicts in time with another one — but note that you can’t register until you drop the conflicting course.
Drop yourself from a waitlist anytime by selecting Drop under Action in Self-Service and clicking Submit.
ADD Codes- When do I need one?
Starting the third calendar day of the class, you’ll no longer be able to freely add classes.
If you try to register after that point, the system will display an “Add Authorization Required” message.
You will need to get an add code from your instructor to register.
Instructors will be working with the waitlist and providing codes to students in waitlist order for closed classes.
How to Use an Add Code,
Log in to Banner Self-Service → Register for Classes.
Enter the six-character add code in the CRN field.
Click Submit.
If the code is valid and space is available, you’ll be enrolled immediately.
If the class is full but over-enrollment is allowed, Banner will process the override automatically.
If the class is full and no over-enrollment is allowed, you’ll receive an error message. If that happens, contact your instructor for next steps.
Add Code Tips and Responsibilities:
Each add code is unique, single-use, and time-limited.
Register before the code expires — unused codes are purged at census.
Keep your confirmation page or class schedule as proof of registration.
Do you need to check on your waitlisted courses?
Use the button below to be directed to the registration self-service page. This is where you Add/Drop/Check on your classes.